Hi buddies!
In our previous session, we saw how to create a counter using an LCD and a single key. In this class, we’ll learn about the working principle of a 4×4 Matrix Keypad.
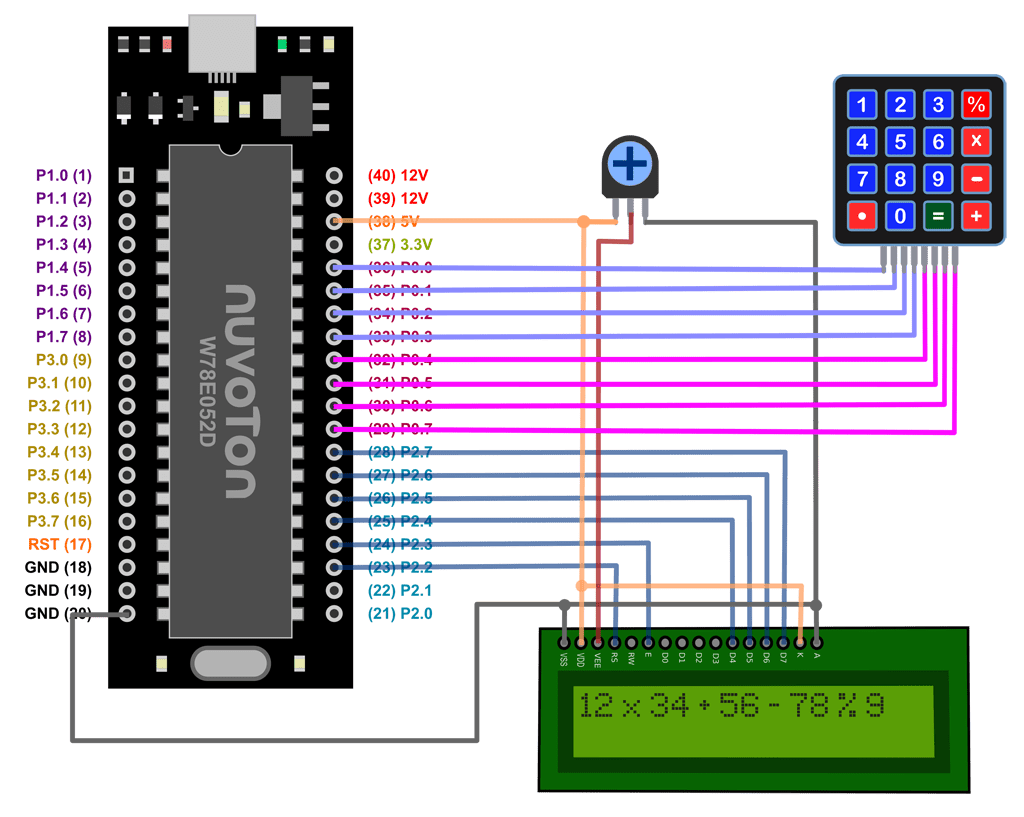
🎛 What is a 4×4 Matrix Keypad?
A 4×4 matrix keypad contains 16 keys arranged in 4 rows and 4 columns. These keypads are commonly used in password entry systems, calculators, and DIY electronics.
🔍 How It Works
Each key press connects a specific row and column, forming a temporary short circuit. To detect which key is pressed, we perform row-wise scanning.
- Set columns as outputs and rows as inputs.
- Drive one column
LOWand othersHIGH. - Read all row lines – if any row reads
LOW, a key is pressed in that column.
To detect a press:
- Send
0xF0to keypad port - If the read value is still
0xF0, then no key is pressed. - If a row reads
LOW, proceed to scan the key position.
To find the exact key:
- Send these values to the port one by one:
B11111110B11111101B11111011B11110111
- After each, read the port. If any of these values result in:
00010000001000000100000010000000
…perform bitwise
&to determine the exact row & column.
Now using the final row and column values, we can look up the correct character from a lookup table.
1 2 3 4 5 6 | cbyte KEY_LOOKUP[] = { KEY11, KEY12, KEY13, KEY14, KEY21, KEY22, KEY23, KEY24, KEY31, KEY32, KEY33, KEY34, KEY41, KEY42, KEY43, KEY44 }; |
⚙️ Detecting 16 Keys
By cycling through 4 column states and checking each row, we can identify which of the 16 keys is pressed.
📚 No Need to Do This Manually!
You can simply use the KEYPAD4X4 library included in our BuddyKit tools. Here’s how:
- In your
build.bat, include:12345rem -------------------------------------------rem Configurationset USE=Delay LCD4 KEYPAD4X4rem Available libraries: Delay LCD4 I2C EEPROM DS1307 SPI LED_7SEGMENT KEYPAD4X4 UART PCF8591 MPU6050rem ------------------------------------------- - The keypad is assigned to
Port 0by default in the header file. Change it if needed. - The key layout is already defined for you, for example:1234#define KEY11 '7'#define KEY12 '8'#define KEY13 '9'#define KEY14 '%'
All 16 keys are mapped to characters: numbers and symbols like +, =, X etc.
1 2 3 4 5 6 7 8 9 10 11 12 13 14 15 16 17 18 19 20 21 22 23 24 25 26 27 28 | #include <8052.h> #include "../library/LCD4/LCD4.h" #include "../library/Delay/Delay.h" #include "../library/KEYPAD4X4/KEYPAD4X4.h" // Function to delay for approximately 1 second void Delay1s(void) { unsigned int i; for (i = 0; i < 20000; i++) { DelayXus(5); } } void main(void) { u8 key; LCD_Init(); LCD_Puts("HI BUDDIES!"); while (1) { key = KEYPAD_GetKey(); if(key){ LCD_Goto(2, 0); LCD_Data(key); } } } |
💻 Sample Code Walkthrough
- Include the
keypad.hheader - Declare a variable to store the pressed key
- In the loop, call
KEYPAD_GetKey()repeatedly - If the return is non-zero, print the key on LCD at 2nd row, 0th column
Simple and efficient keypad integration!
Leave Your Reply
You must be logged in to post a comment.