🔐 Build a Simple Digital Door Lock Using 8051 and BuddyKit
Hi buddies! 👋
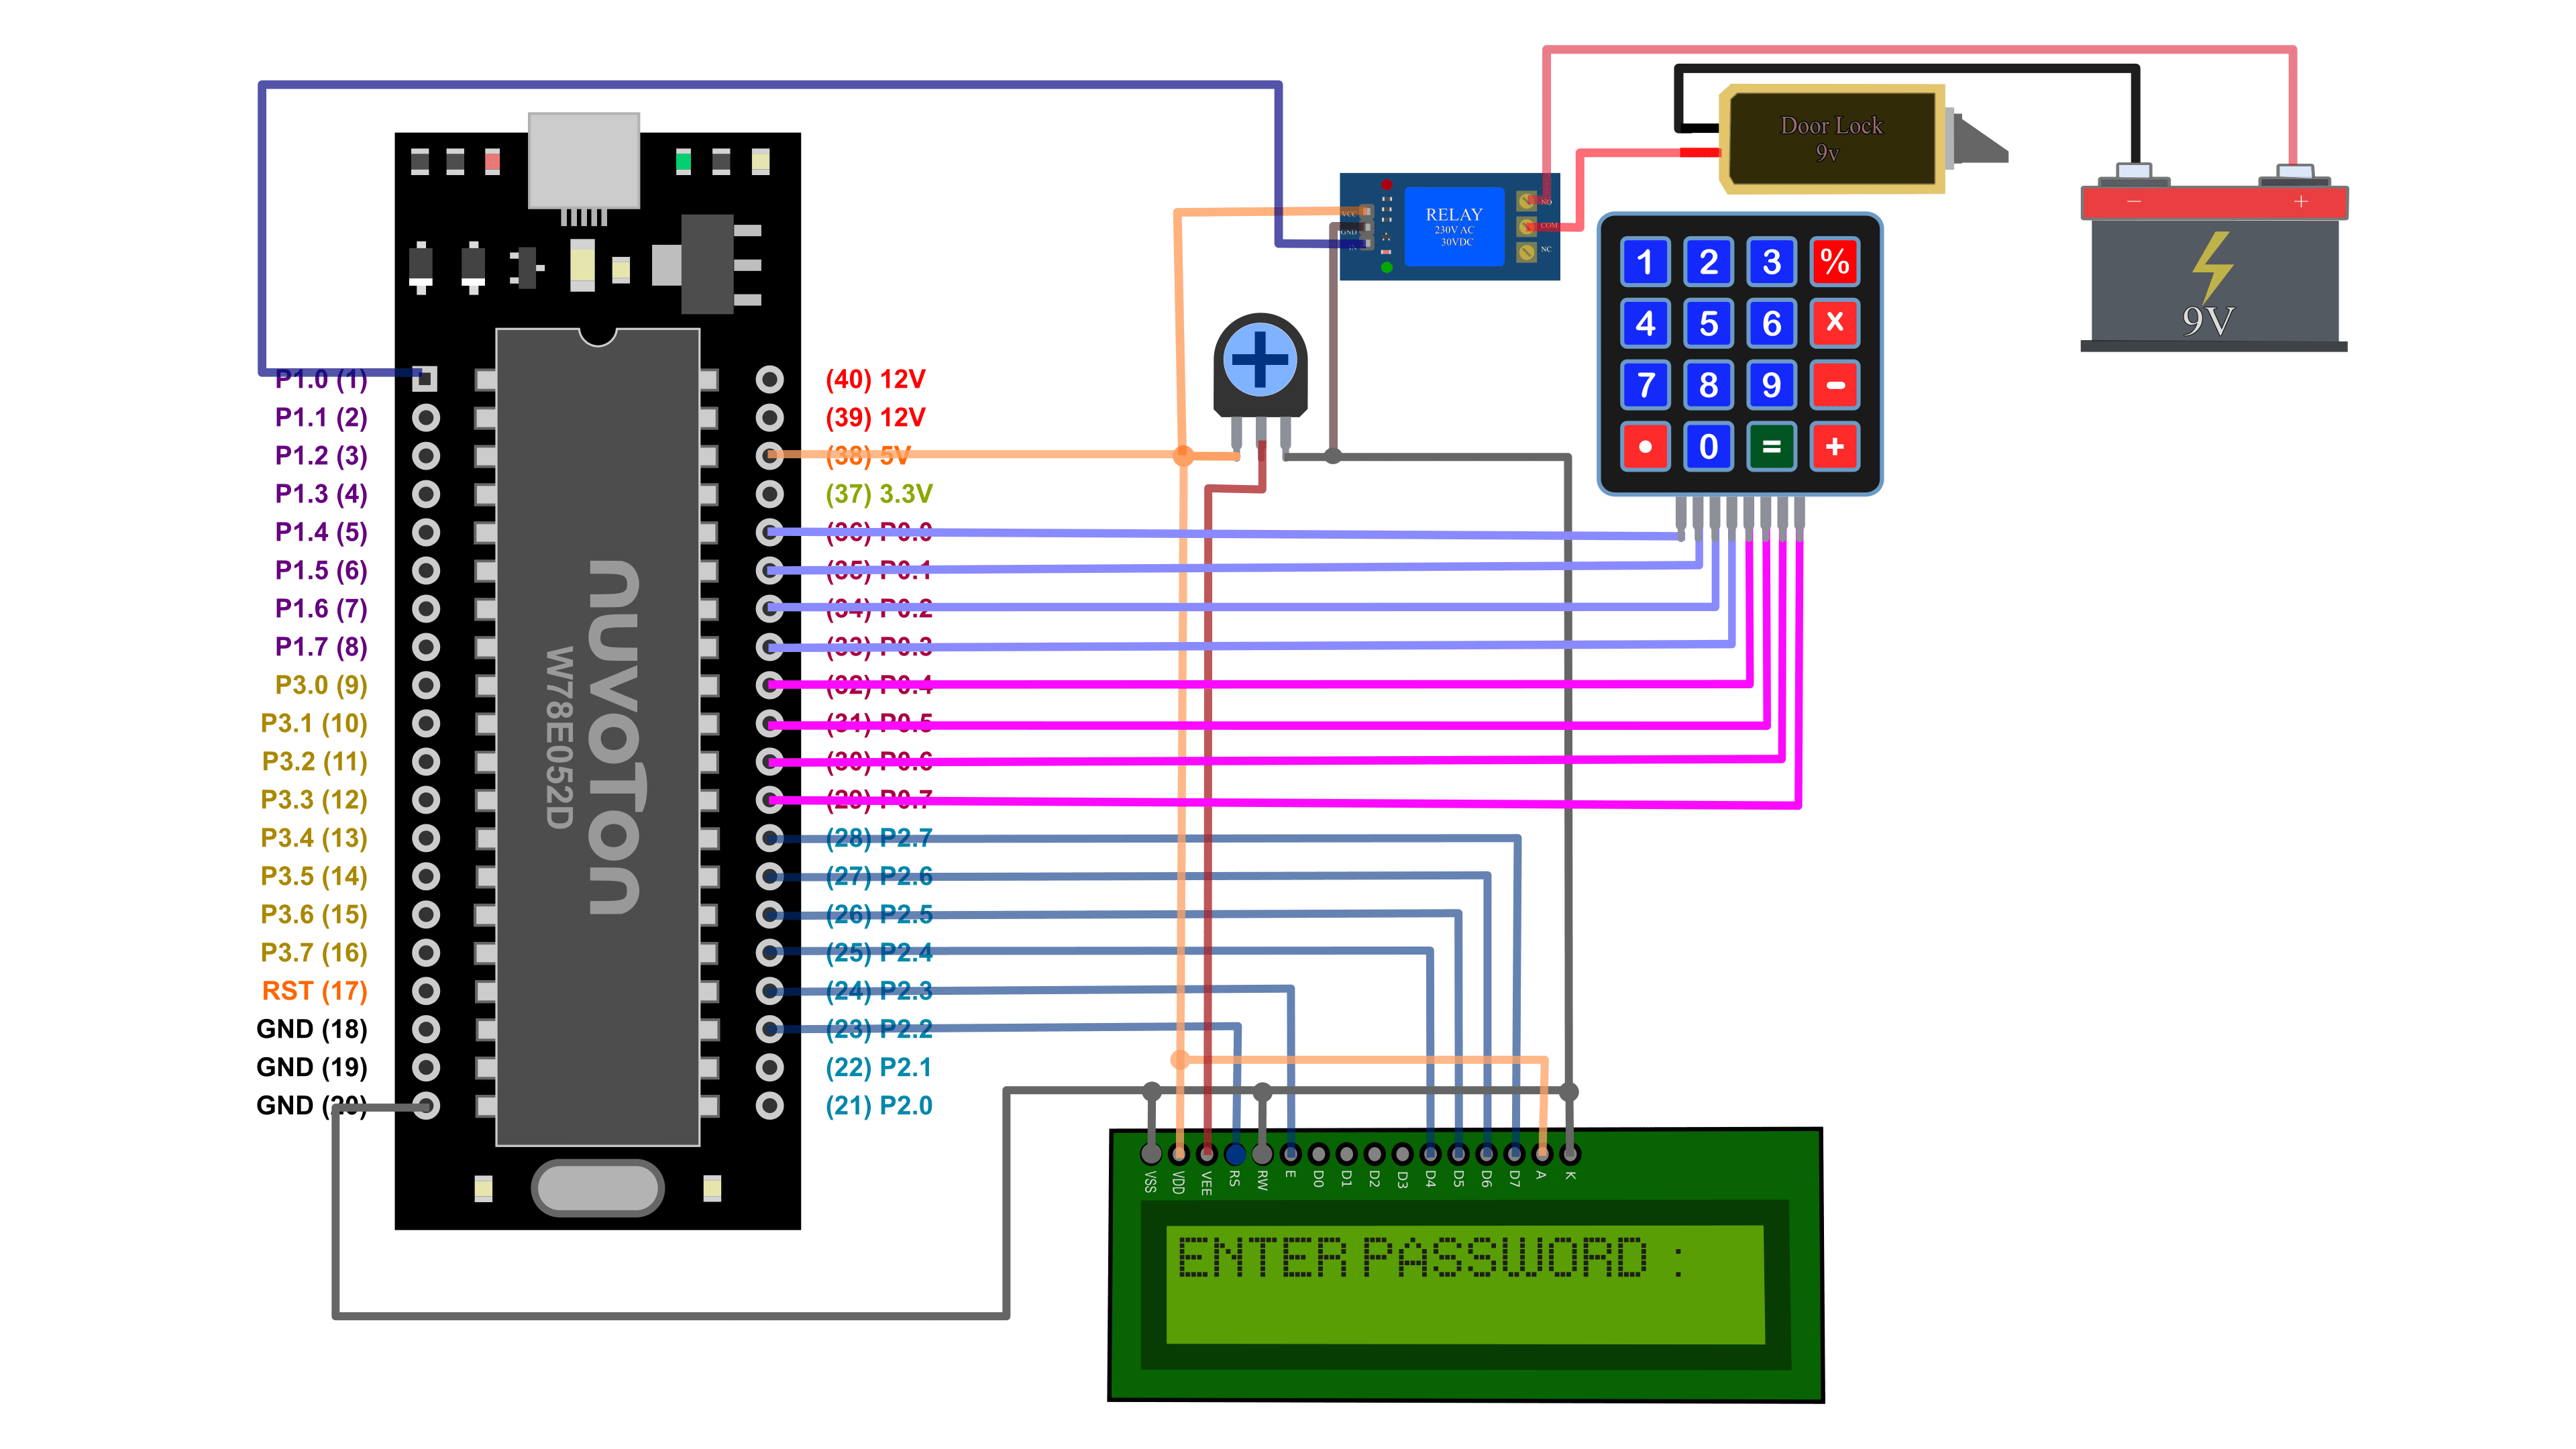
In this class, we’re building a simple digital door lock system using the Buddy51 Mini development board. This project uses a 4×4 matrix keypad to enter a password and a relay connected to a digital pin to control the lock. The status of the door (Locked or Opened) is displayed on a 16×2 LCD screen.
📌 What You’ll Learn
- How to define and use digital pins to control relays
- Storing and comparing passwords using arrays
- How to use LCD to show real-time door status
- Using keypad input securely with masked characters
⚙️ Hardware Used
- Buddy51 Mini Board
- 4×4 Matrix Keypad
- 16×2 LCD Display
- Relay Module (connected to P1.0)
- Connecting wires and 5V power
📺 LCD Function Recap
We’re using the same LCD4 library from our previous classes, which includes the following functions:
LCD_Init()– Initialize the LCDLCD_Command()– Send commands to the LCDLCD_Data()– Display single characterLCD_Puts()– Display stringsLCD_Clear(row, col, len)– Clear specific section
🔒 Project Overview
We’ll use P1.0 to control a relay module, which will physically lock/unlock a door. A variable called isLocked keeps track of the door state – 1 means locked, and 0 means open.
The # key will be used to lock the door, and the A key will unlock it. On locking, the user is asked to set a 6-digit password. To unlock, the entered password is verified with the stored one. If it matches, the door opens. Otherwise, it shows “Denied!”.
🧠 Logic Flow
- Initialize LCD and relay pin (P1.0)
- Set initial status to unlocked
- When
#is pressed and door is open → ask user to set password - When
Ais pressed and door is locked → verify entered password - If correct, unlock the door; else display denied
💡 Program Code
1 2 3 4 5 6 7 8 9 10 11 12 13 14 15 16 17 18 19 20 21 22 23 24 25 26 27 28 29 30 31 32 33 34 35 36 37 38 39 40 41 42 43 44 45 46 47 48 49 50 51 52 53 54 55 56 57 58 59 60 61 62 63 64 65 66 67 68 69 70 71 72 73 74 75 76 77 78 79 80 81 82 83 84 85 86 | #include <8052.h> #include "../library/LCD4/LCD4.h" #include "../library/Delay/Delay.h" #include "../library/KEYPAD4X4/KEYPAD4X4.h" #define RELAY_PIN P1_0 // Relay control pin void getPassword(char *buffer) { u8 key; u8 count = 0; LCD_Clear(1, 0, 16); LCD_Puts("Enter Password:"); LCD_Clear(2, 0, 16); while (count < 6) { key = KEYPAD_GetKey(); if (key >= '0' && key <= '9') { buffer[count++] = key; LCD_Data('*'); } } buffer[count] = '�'; // Null terminate } u8 checkPassword(char *saved, char *entered) { u8 i; for (i = 0; i < 6; i++){ if (saved[i] != entered[i]) return 0; } return 1; } void updateStatus(u8 status) { LCD_Clear(1, 0, 16); LCD_Puts("Digital Lock"); LCD_Clear(2, 0, 16); if (status) { LCD_Puts("Locked"); } else { LCD_Puts("Opened"); } } void main(void) { u8 key; u8 isLocked; char password[7] = {0}; char input[7] = {0}; LCD_Init(); RELAY_PIN = 0; isLocked = 0; updateStatus(isLocked); while (1) { key = KEYPAD_GetKey(); if (!key) continue; if (key == '#' && !isLocked) { getPassword(password); RELAY_PIN = 1; isLocked = 1; updateStatus(isLocked); } if (key == 'A' && isLocked) { getPassword(input); if (checkPassword(password, input)) { RELAY_PIN = 0; isLocked = 0; updateStatus(isLocked); } else { LCD_Puts("Denied!"); DelayXms(1000); } } updateStatus(isLocked); } } |
🧠 Code Explanation
RELAY_PINis defined for easy control of door lock.getPassword()function takes 6-digit input and stores it as masked (‘*’) characters on display.checkPassword()compares saved and entered passwords.updateStatus()refreshes the LCD with current door status.- Main loop handles locking and unlocking based on keypress (
#for lock,Afor unlock).
Once uploaded to Buddy51 Mini, power the board and try locking and unlocking using your keypad. If you enter the correct password, the relay turns off, unlocking the door!
📺 Output
- # Key → Set password and lock door
- A Key → Enter password to unlock
- Wrong password → Shows “Denied!”
❓ Have Doubts?
If you have any questions about the digital lock logic, relay handling, or keypad interfacing, drop them in the comments or our forum at BuddyKit.io.
Happy Learning! 💡
– Team BuddyKit
Leave Your Reply
You must be logged in to post a comment.